You know how sometimes you have such great intentions, and then you get thoroughly and completely sidetracked? That was today. I had plans to clean out my pantry. I got to my flour jar and it was nearly empty, with a big bag of unopened flour leaning against it. I was admiring my flour jar. It is not an antique, but a Target knockoff that looks like the old ones my mom had growing up. I really wanted to label it, but of course I just couldn't use masking tape or my trusty Sharpie. So, I got out my old jar of glass etching cream. What followed was procrastination at its finest. I highly recommend it.
If you want to etch a design or image on glass, you will need these supplies:
1. Something glass (jar, drinking glass, picture in a frame, jug, etc.)
2. Etching cream (I use Armour Etch)
3. An X-acto knife
4. Clear Contact paper
5. A magazine or cardboard upon which to cut
6. A design or word you create or print (pen, paper, computer, printer)
7. A desire to procrastinate, or a desire to create a nice design

First I designed my own font. It started out pretty messy, as you can see. Now, if you want to create a glass etching, don't feel that you need to create your own letters. Simply type out the word you want in a font you like. Then, print it out. It's that easy. Sometimes, for procrastination or aesthetic purposes, I just make things more challenging.

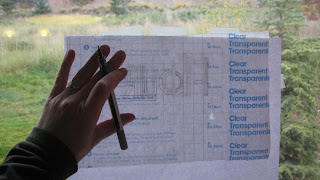
Then, I traced my word onto clear Contact paper. I taped it up on my sliding glass door so I could see it clearly. This is a handy technique. Tips--it helps to use pencil, since with ink, you're at a bad angle for it to run smoothly. Also, if you're doing this in the evening, you'll need to turn on your inside light and step outside. Now, it is very important if you are using a word, to make sure you have it the right way! I copied my word on backwards to the "paper" side of the Contact paper. Peel a tiny bit away from the corner to see where the sticky side is. This will help you know where to copy your word or image so it will transfer correctly.

Placing my Contact paper with its "Flour" outline on top of a magazine, I cut each letter out with an x-acto knife. The way I created my letters, the "R" was the only one with a section that came out. I kept that inside piece (bottom right of picture), so I could put it on the glass jar latter. If you have letters like this, cut the inside first (like my "R" section. Then cut the outer part of the letter.

I peeled the backing off the Contact paper and stuck it to my jar, lining it up horizontally. Then I used my fingernails to rub and press the Contact paper down all the way up to the edges, firmly sticking the stencil onto the jar. I painted the "Armour Etch" on with a paintbrush. WARNING: this stuff is toxic. It is seriously intense. I mean, it etches glass, so what do you expect? But honestly, they asked for my ID when I bought it. I know, I know, I look young, but the point is, they don't want any kid near this stuff. And for good reason. Use it wisely. Make sure you keep it far away from your children, your pets, your eyes and anything else you care about. Follow the instructions on the jar for timing and washing. For mine, I kept it on for 5 minutes, washed it with tap water and then cleaned it with vinegar (glass cleaner).

Here is my final etching, an art-deco print "flour" on my flour jar. There were some spots that didn't take the etching very well (especially on the letter "O"). I think this is due to oils or fingerprints on those spaces, although it may be due to my etching cream being old. I am going to look it up to see if I can find any tips. I tried to touch those spaces up, and a second coat didn't take either. Any advice is welcome.
Ok, I suppose I should really clean out my pantry now. Wait, I see a plain sugar jar...


I just found another blogging crafter who recommends keeping the etching on for 15-20 minutes.
ReplyDeleteOn my recent glass etching projects I have kept the cream on for 15-20 minutes with excellent results.
ReplyDelete