Showing posts with label tutorial. Show all posts

Monday, May 9, 2011

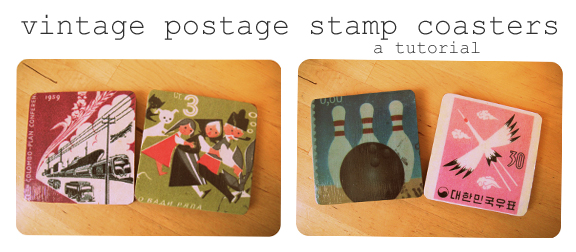
Coaster Tutorial with Vintage Postage Stamps

Make your own colorful coasters from images of vintage postage stamps. 


Supplies:
Wooden or bamboo coasters (I got mine at Target for $4)
Four images printed in high quality to fit the coasters
Large paintbrush (bigger than in the picture)
Mod Podge, matte or glossy
Acrylic sealer, matte or glossy (not in the picture)
Paper cutter or scissors

1. Print your images.  These four vintage stamp images plus a couple more are available to download and print at the bottom of this page.  They will print 4" x 4", since that seems to be the typical coaster size.  


2. Cut your images to size.  Mine were 4" x 4".  I rounded the corners slightly to match the bamboo coasters I bought.


3. Using a large paintbrush, spread your coasters with a thin, even layer of Mod Podge.


4. Lay your image on top of the Mod Podge and gently press down, starting in the center and working out. Make sure the edges are lined up well.  Then, wipe away any Mod Podge that leaked out.


5.  Let your image dry for 20-30 minutes.


6. Spread a thin, even layer of Mod Podge over your images.


7.  Let it dry 20-30 minutes until it is dry and clear.  
8.  Add a two more coats, allowing them to dry in between applications.


9. Take your coasters outside where you have good ventilation.  Spray them with your acrylic sealer according to the bottle's directions.  I sprayed two coats of glossy.
(If you're outside, pay attention to the wind; you don't want this toxic stuff to spray all over you accidentally.  Also, make sure you're not somewhere with lots of dirt or dust that may blow onto your coasters while the sealer is drying.)


10. Let your coasters dry and then bring them inside.
Pour yourself a drink.

Printable vintage stamp images:
You may need to resize these, depending on your coaster size.


Wednesday, April 27, 2011

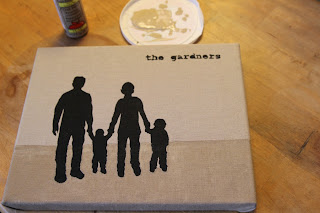
Modern Silhouette Tutorial


Paint your own modern silhouette.
It's easy!


Supplies:

A picture of you, or your family (see tips at the bottom of this page)
Freezer paper
pencil
X-Acto knife
cutting mat or cardboard
Iron
Thin cardboard box (cereal box)
Silkscreen ink or fabric paint (I like Permaset silkscreen ink, but even the cheap stuff will work for this)
paintbrush
computer and printer
fabric (or a napkin if you're using a small canvas, like me)
stretched canvas (this can be the cheap craft store kind)

Begin:

1. Take a picture of you in action, or you and your sweetie, you and your child, you and your dog.  Perhaps you just want a picture of your dog...Why not?  Anything works.  This is a modern silhouette, not an old stuffy profile.


Here's our photo.  Background is horrible, but it doesn't really matter.  Wish I hadn't been wearing that sweater.  I had to redraw the outline so it looked ok on the silhouette.  My husband commented that we all look bulky in our winter wear and thought we should do this project in the summer.  The photographer (our sweet neighbor) cut our toes off, so I had to draw them in.
    2. Print out your digital picture from the program you use on your computer.  If you need to, resize it as large as you like.  (If you need more info on this step, please contact me.  I'm happy to explain more.)


    3. Tape your picture to a window or sliding glass door during the day.  Tape a piece of freezer paper on top of it (slick side against the window).  Using a pencil, trace the outline of the figures in your picture.  (If you're working at night, turn your lights on and go outside.  Tape to the outside of your windows.  :)  )  For pictures of this, go to DIY glass etching in my tutorial section.

    4. Place the freezer paper on a cutting mat or cardboard and cut out the figures with an x-acto knife.


    5. Place the cereal box on your ironing board, your fabric, right side up, on top of it and your freezer paper on top of your fabric, slick side down.  Iron your freezer paper onto your fabric, making sure to push down on all the edges.  I have found that ironing with only the pad of the ironing board underneath the fabric doesn't allow for crisp enough edges.  (Warning: Make sure you have your cereal box positioned well.  There is often a very particular glue on the edges of cardboard boxes that you do not want melting onto your fabric with the iron.  Watch out for this!  I speak from experience.)

    6. Paint with silkscreen ink.  Let dry overnight.


    7. Peel away your freezer paper.  Iron your print by the directions on your ink to heat save your print.


    8. Type out your names in Microsoft Word.  Play with different fonts and sizes until you get the feel you want.  Print out your typed name.  Alternatively, use letter stamps and stamp them onto your fabric.  For my font, because it was so small and because I like a "messy" feel, I did not include the inner parts of the letters "g", "a", "d", and "e".  But if you want something "cleaner" then make sure to cut out those inner parts and save them to iron them on your fabric.


    9. Take your canvas out and make sure you get your letters and portrait in the right place before ironing.  Trace onto freezer paper and cut out with x-acto knife (steps 3 and 4).  Then iron onto your fabric in the place you like (steps 5-7).


    10. Ok, now you have your fabric printed.  Here I was super excited to have this fabric ready to put on my canvas, and then I lifted the freezer paper off of our name and ...argh!...there was glue from the underneath cereal box melted onto the fabric.  Told you I learned by experience.  So, I painted a little line to try to cover it up.  Didn't look great.  I decided to paint in the bottom portion of the fabric, so it looked like we were standing on ground.  But, I knew this would be easier after stretching it on the canvas, so I waited.


    11.  Get out your canvas and line up your lettering and picture just right.


    12.  Blam!  Staple that fabric in the center of the back wooden frame, beginning in the center.


    13. Keeping the tension taught but not too stretched, staple with your staple gun along the top edge of your canvas.


    14. Pull your fabric across the front of your canvas, holding firmly but not too tightly, making sure the weave of your fabric is even.  Then staple the fabric along the back bottom edge of the canvas.


    15. Continue stapling along the side edges, pulling the fabric so it is stretched but not too tight all around the frame.  Each time, staple the center of the side first, then along the outer edges.


    16. Now cut away any extra fabric you have along the back of your canvas so it is easier to work with when folding down each corner.


    17. On your first corner, fold down one flap.  I decided to make these creases of the fold on the top and bottom of my canvas, rather than the sides.  I thought this would be less visible once the canvas hung on the wall. 


    18.  Staple that top flap down.


    19.  Now fold the side flap over the first staple.  Staple the side flap down.


    20.  Do this on all four corners.  They should look like the photo above.  If you would like the back of your canvas to look better, you can now cut all the fabric straighter.  If you feel like it doesn't matter, because it will be hugging your wall, then you're done!


    21. The front of your canvas will have nicely tucked corners.  Oooh.  Nice.


    22. Now I added the "mistake element"--the ground--that frankly, I love!  Thank the Universe for mistakes.  It can bring the most creative moments to my work.  However, if you happen to really like this look, I highly recommend you do this first.  Paint it on using a ruler before you put your portrait stencil on the fabric.  It will be easier.  But you can do it at the beginning or at the end.  At the end, you just have to carefully paint around your portrait stencil.  I also used my paint on the bottom of the canvas and the "ground" portion of the sides.  By the way, here I did not use my favorite silkscreen ink.  I used $.99 acrylic Wal-Mart paint.  


    23. Hang your beautifully hand-created family portrait silhouette on your wall.  


    Tips for taking a good silhouette photo(Please read):
    • Make sure you get your picture either straight-on or as a profile.  3/4 turns look odd in silhouette.
    • Make sure legs are at least slightly apart.  If they are together, the silhouette looks more like a puppet on a stick.
    • Make sure arms are also slightly away from the body.
    • If there are two or more people in the photo, make sure your bodies are not overlapping too much.  You'll see how this can turn out oddly in a silhouette.  Think two-headed monster.
    • Use a digital camera and take many photos.  Sometimes the ones you don't expect to be your favorites are the best ones. 
    • Make sure the lighting is such that there will not be heavy shadows on your figures.  This will make finding the outline of people more difficult.
    • It doesn't matter if your eyes are closed or if you're making a funny face (awesome, eh?).
    • It will be easier to cut out your silhouette if you are against a fairly blank background, such as a plain wall or a fence.
    • Make sure your whole body is in the picture.  Cutting a figure off at the ankles will not work for these modern silhouettes.


    Here is another example of modern silhouettes I made of my niece for my mother.  I turned it into a pillow for her for Mother's Day two years ago.  


    Anna Scout dancing at 2 years old.  I love that she is barefoot!


    Tuesday, January 11, 2011

    Knight's Tunic Tutorial


    Make a Knight's Tunic for a Child


    Make a knight's tunic costume for your child.  This tutorial depends on the materials you have and the size and age of your child.  I give you a lot of guidelines so you can see what to do, but not exact measurements.  You can use this as an inspiration, a guide.  
    Make it out of what you have.  Make it for who you love.  Make it the way you want.

    What you will need:
    a sweater that fits your child to use as a template
    a solid color recycled wool sweater, felted in the washer (more instructions below)
    leather, canvas, pieces of sweater (from the sleeves) or other strong fabric for shoulder straps
    fabric for an applique embellishment on the front
    fusible webbing (for the applique)
    fabric pencil or marker
    matching or contrasting thread
    sewing machine

    Instructions:
    1. Go to your local thrift store or your closet and find a used wool sweater in an adult size.  For this project, cotton and acrylic will NOT work.  Wool can be felted in the washing machine to a thick, dense material, suitable for a knight.  I recommend a gray sweater, but use what you like.

    2. Put your wool sweater in the washing machine on HOT with a bit of laundry soap.  

    3. Put your sweater in the dryer on HOT.

    4. Take it out and see how it "felted" down.  It should be fairly stiff and thick.  If not, send it through this process again (double checking to make sure it is wool and not another material).

    5. After it has been washed to a thick felt, you will want to cut off the sleeves.  If your sweater has a normal neckline, you could leave it as it is.  If it is a turtleneck, or if you would like to make shoulder straps like I make, cut out the neck also (look at pictures for a more detailed example).  Lay down a sweater that fits your child and follow the sleeve lines and neck lines.


    6.  Cut two pieces of fabric for the shoulder straps.  I cut mine out of recycled leather from a skirt I bought at the thrift store.  You could use the sleeves of your sweater if you'd like, or any other sturdy fabric you have laying around.  I cut mine 2 inches wide and about 10 inches long. Since I cut mine out of leather, I didn't have to hem them; they won't unravel.  Felted wool also won't unravel.  If you choose to use canvas or another material, you will need to make your straps about five inches wide, sew the long sides right-sides together, turn them right sides out and press them.  However, I recommend using a fabric that you won't need to hem, such as leather or felted wool.

    7. Pin the two shoulder straps onto the front and back of the tunic, leaving plenty of room upon which to sew them.  Make sure the left and right strap are sewn on evenly so that they hang the same on each shoulder.


    8. Sew a square around the edges of the shoulder strap, with an X in the middle.  


    9. Cut a design out of paper for the embellishment on the front of your knight's tunic.  A cross, a dragon or a fleur de le are some good ideas.  My cross is not exactly symmetrical, since I drew it by hand, but I like it.  Feel free to do a google image search to find exactly what you want.  Print the image you find and trace it onto your paper.


    10. Cut out your image and use it as a template.  Use a fabric pencil or marker to trace your stencil onto your other fabric.  I used a bright red leather jacket I found at the thrift store.


    11.  Use a fusible webbing or steam-a-seam or other fusible applique backing.  Follow the manufacturer's instructions to apply this backing to your applique design.  (Ok, I am going to admit something for you here.  I tried steam-a-seam, my trusty side-kick--picture above.  Then I tried a fusible webbing.  Neither worked since I was trying to adhere leather to felted wool.  So, in the end, I resulted to using double-sided sticky tape.  I'm quite sure this is a major, major no-no.  But I did it anyway, out of desperation.  And...it worked.  I don't plan on washing this outfit, but rather relying on simple spot cleaning, so I think I'm ok.  Thanks for listening to my confession.)


    12. Set your sewing machine to a satin stitch (get out your instruction booklet if you've never done this before).  Stitch carefully around your design using a satin stitch.


    Let your knight begin training.


    Monday, January 10, 2011

    Coconut Lemon Body Scrub


    Make your own delicious coconut lemon body scrub.  This is a scrumptious exfoliating and hydrating scrub for your body.  It is easy to make and costs a fraction of the body scrubs you can buy.  I've been making different recipes of these for months now and this is my favorite.  Feel free to take this as a starting point and alter your recipe as you like.  Add your favorite essential oils.


    Ingredients:
    1 cup coconut oil
    1 cup sugar
    1/4 cup almond oil
    2 T. coarse salt
    1/8 t. lemon essential oil
    Five 1/4-pint canning jars or other small containers

    Put one cup of coconut oil in a stainless steel pot on the stove on low.  If you have a diffuser, use it.  If not, put it on your lowest setting.  You want to just barely melt the coconut oil.  Don't let it get too hot.  It has a very high melting temperature and thus will melt quickly.  

    In a separate bowl, mix the sugar, salt, almond oil and lemon essential oil.

    When the coconut oil has just melted, stir it into the bowl with the rest of the ingredients.  Keep stirring while you pour into jars to make sure to get an even balance of ingredients in each jar.  You will be able to fill five 1/4-pint canning jars with this recipe (the itty-bitty jars).  When you open the jars, you may need to remix the ingredients, as the coconut oil will naturally rise to the top.

    Make some labels and then get in the shower with your new scrub.  Share the others with friends.

    Instructions for use: Bathe or shower normally.  Gently massage your skin with your coconut lemon body scrub.  Rinse.  Dry off.  Enjoy your silky smooth skin!

    Caution: the oils from this scrub can leave your shower or bath floor oily, so please be careful.
    Related Posts Plugin for WordPress, Blogger...