Showing posts with label paper. Show all posts

Tuesday, June 28, 2011

3D Paper Calendar: 30 Days of Creativity: Day 27

3D Paper Camper Calendar 


This is just too cool to pass up.  
A camper van 3D calendar.
Calendars are kind of out of fashion these days it seems.
Everyone is using their computer, iphone, or something else digital to store their daily musings.

To get yours, go to The Calendar of the Month Club and download this months 3D calendar.
Print it out.  It will look like this:


Cut, score, fold and glue (I used a glue stick).


Set up your camper, chairs and fire.


Yes it even comes with a fire pit.


Bonus: you get four tiny bumper stickers for your camper, which if glued in order are a limerick.  

Wednesday, June 15, 2011

Stamped Cards: 30 Days of Creativity: Day 15

Handmade stamps
Handmade cards

I carved a few little stamps today.


I made some simple lines that remind me of plants or wood grain.


Then I printed them on cards with a black ink pad.


These have blank spaces so I can write something in later.


These have plenty of room for words or more color.


And I made a little stamp with my initials for the back of the cards.


Tuesday, June 14, 2011

Sunday, June 12, 2011

Ink Drawings: 30 Days of Creativity: Day 12

Sketches of my favorite levers


Ok, so I just can't help being a physics nerd.  A very simple physics nerd, that is.
I think simple machines are so cool.
After teaching seventh grade physics with levers, pulleys, inclined planes, screws (an inclined plane wrapped around a cylinder), and reading the book One Good Turn, I declared myself in love.


Today in particular, I am in love with the lever.
So I have this idea that I'm going to create some linoleum prints of all my favorite levers.


Right now this is my list:

Hammer
Stapler
Shovel
Clothes Pin
Garlic Press
Fork
Scissors
Wheel Barrow
Pliers
Safety Pin
Broom


I want to create nine small prints of levers to organize together.  
So I have to limit my list to nine.

What's your favorite lever?


Vellum Airplanes: 30 Days of Creativity: Day 11

30 Days of Creativity: Day 11
Printed Vellum Airplanes


When I lived in NY, I spent many days enjoying The Gates project in Central Park.  I used some cropped photographs I had taken of The Gates and printed them on Vellum paper.  The photo on Vellum paper gives a luscious translucence that I like.


Plus, the Vellum paper is a good stiffness for flying planes.


When The Gates were up in Central Park, I loved the feeling the bright, sun-filled orange gave against the blue of the sky.  Such joy!

I think it would be fun to string a lot of these airplanes together to hang in my boys room.  Perhaps their new room will be decorated in airplanes.  


To string my airplanes, I used a simple needle and thread, woven along the base of the airplane.


I made sure it wove in and out along the base, from tail to tip.  Then I left some thread and started the next airplane.


Inspiration #1 for this project: The Gates in NYC.


Inspiration #2: walking under all the "paper airplanes" at the Denver Airport.


Sunday, June 5, 2011

Fabric Cards: 30 Days of Creativity: Day 4

Fabric Cards

I'm going to two high school graduations today.
I made some simple fabric cards for my former students.
I taught 18 children at the Waldorf School here, for seventh and eighth grade.
Now, they are graduating high school.
Congrats to the 16 amazing seniors who graduate this week and the 2 who graduated a year early.  I am so proud of you all!
Here are a few of the cards...


Wednesday, June 1, 2011

Lino Cuts: 30 Days of Creativity: Day 1

Today is June 1: Day 1 of my 30 Days of Creativity

Creating things is already a habit for me, part of life.  
In fact, I get pretty depressed if I can't create things on a regular basis.

But it will be a huge challenge to put these things up on the blog each day.
Wow!

I'm following the 30 Days of Creativity Challenge and will be putting my images up on Pinterest too.
Happy Creating to all of you involved!

Today, I set out to make some draft prints of my lino print I finished this weekend.  This is Solomon splashing in a puddle with his rain boots on.  


They are either not full enough with ink, or too heavy with ink.  But really I just wanted to see if I needed to cut anymore away.  Lesson remembered: less is more!  I wish I had left more in certain areas.  Process, process, process.

Monday, May 30, 2011

Puddle Days

It has been raining for days.
A constant cloud has been hanging over our normally sunny sky for so long.
Each day is a puddle day.
Since we're spending all our time in puddles, or inside, the rain has been finding its way into my art.

Oliver in the puddles:


Solomon in the puddles:

The beginning of a lino print of Solomon's rain boots in a puddle.

I haven't started printing yet, so I'm expecting some reworking will be necessary.  We'll see.  

Rain, we love you in your cozy, blustery wetness.
Sun, we miss your warmth.  You may come kiss our faces any day.
We're ready.

Monday, May 9, 2011

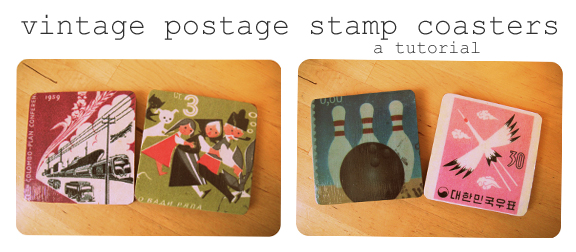
Coaster Tutorial with Vintage Postage Stamps

Make your own colorful coasters from images of vintage postage stamps. 


Supplies:
Wooden or bamboo coasters (I got mine at Target for $4)
Four images printed in high quality to fit the coasters
Large paintbrush (bigger than in the picture)
Mod Podge, matte or glossy
Acrylic sealer, matte or glossy (not in the picture)
Paper cutter or scissors

1. Print your images.  These four vintage stamp images plus a couple more are available to download and print at the bottom of this page.  They will print 4" x 4", since that seems to be the typical coaster size.  


2. Cut your images to size.  Mine were 4" x 4".  I rounded the corners slightly to match the bamboo coasters I bought.


3. Using a large paintbrush, spread your coasters with a thin, even layer of Mod Podge.


4. Lay your image on top of the Mod Podge and gently press down, starting in the center and working out. Make sure the edges are lined up well.  Then, wipe away any Mod Podge that leaked out.


5.  Let your image dry for 20-30 minutes.


6. Spread a thin, even layer of Mod Podge over your images.


7.  Let it dry 20-30 minutes until it is dry and clear.  
8.  Add a two more coats, allowing them to dry in between applications.


9. Take your coasters outside where you have good ventilation.  Spray them with your acrylic sealer according to the bottle's directions.  I sprayed two coats of glossy.
(If you're outside, pay attention to the wind; you don't want this toxic stuff to spray all over you accidentally.  Also, make sure you're not somewhere with lots of dirt or dust that may blow onto your coasters while the sealer is drying.)


10. Let your coasters dry and then bring them inside.
Pour yourself a drink.

Printable vintage stamp images:
You may need to resize these, depending on your coaster size.


Related Posts Plugin for WordPress, Blogger...