Thursday, September 30, 2010

Blessing Way

Life is Beautiful!

My friend is full of life and due with her second child any day now.  The official due date is October 7th.  I am especially excited, for I get to be at the birth.  I've been at one other birth besides those of my two sons, and I'm hoping to get my doula training this year.  The photo above is one I took of my friend a couple weeks ago.  I'm hoping my new camera arrives before her Little One.

In preparation for birth, we honored our friend with a Blessing Way a couple weeks ago.

Blessing Ways are such beautiful ceremonies that I just wanted to share a couple of thoughts about them.

We don't have nearly enough meaningful rituals, rites of passages and positive ceremonies in our culture these days.
I crave them!  Do you?

A Blessing Way honors the mother before she gives birth.  It is not a Baby Shower, which focuses on the baby and presents.  A Blessing Way is a time to circle around the mother-to-be, give her strength, love, hope, encouragement.  It is a time for us to be meaningful, purposeful and create a circle of light for a mother as she prepares herself for the initiation of birthing and the journey of motherhood.  


There are many symbolic rituals you can create for a Blessing Way.  
Here are a few that I've been a part of:

Adorn the mother with flowers or a flower crown.

Soak and rub the mother's feet, rub her back, arms, hands.

Paint the mother's toes (she has a hard time reaching them herself)

Decorate the mother's belly with henna.  Each woman at the Blessing Way can add to the design.

Bring symbolic items for an alter for the mother.  Choose something meaningful to bring her strength, help her let go, give her grace, humor, lightness, rhythm...whatever you feel is best.  Perhaps this is an element you feel she needs or a strength you have gift you have and want to share with her.  Perhaps it is a strength of hers that you want to recognize, reminding her of who she is.

Bring a symbolic bead.  Everyone can speak of what their bead represents.  Then the beads are strung together in a necklace for the mother to wear during labor or hang near her.

Bring a symbolic item that is hung from a branch.  This can later be transformed into a mobile for the baby.  It may be filled with beads, feathers, shells, words, anything that can be incorporated into the branch or hung from it.

Write down qualities you want the mother to remember or sayings or poems to help her along the way.  Keep these as cards the mother can flip through when needing some support, or bind them in a simple book.

Add any elements of ritual and celebration that you would like to include:  Candles, food, song, photographs, dance, stories...

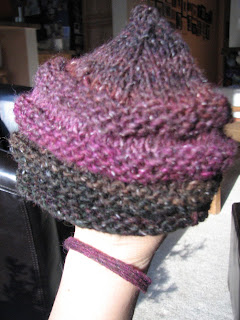
Have everyone sit in a circle.  Take a skein of yarn and wrap a section around the mother's wrist.  Then pass the yarn to each person, letting them wrap the yarn around their wrists.  In the end, each woman is connected to the mother.  When the yarn is then cut, each woman ties her portion on her own wrist.  They wear the yarn bracelet until the new baby is born.  For me this ritual is very powerful.  I love the feeling of all being connected.  Even when the circle is physically broken, we each hold a portion of that circle.  Often times it can be challenging to remember to think about something that I want to hold in my mind and heart.  I often want to participate in a daily meditation, something I'm working on, or want to hold someone in my thoughts who needs extra thought, care, prayers.  This can be hard to do as we go about our daily lives.  Sometimes it takes a reminder for me to revisit my intention.  Having a visual on my wrist means that every time I reach out with my hand, I am reminded of the mother's journey.  I have her in my thoughts dozens of times each day.  She knows that each woman at the Blessing Way is also thinking of her each day, remembering the emotional and spiritual gift that they wished upon her.  


For my friend, I took the rest of the skein of yarn and knit her Little One a hat.  It is kind of an elfin beehive hat.  I think it may be a bit too big for her/his first day of life, but it will fit sometime during our winter.  

Ok Little One, your Mama is fully Blessed.  We are all excited to meet you and welcome you to this world.  The space has been created.  When you are ready, we are ready to receive you.


Tuesday, September 28, 2010

Little Bird Sachet from Sewn Spaces

Joel Dewberry recently came out with a book of sewing projects, Sewn Spaces.


The blue sewing machine on the front cover was enough for me to want it.  That, and Joel Dewberry has created some amazing fabrics.  So, I got it.  The book itself is beautifully created.  The colors and layout are great design.
I must say, however, that the book overall is not that impressive. If you are considering purchasing the book, I highly recommend you go to a bookstore and flip through the whole book, making sure there are specific projects that interest you.  There are certain sewing ideas that I see in every collection of patterns--apron, yoga bag, market bag, pillow, journal cover, napkins, fabric cards.  Here they are again.  Really, what makes these projects different is that they use Joel Dewberry fabrics.  

My obsession with little birds has not ceased, however, and so I decided to make the bird sachet or pin cushion.  Now, this is the largest pin cushion I've ever seen. It's seriously a bit big to really be a pin cushion. (Can you tell from the picture?  I'm holding it in my hand and it fills my hand.)  But it is cute.  I didn't do some of the details, such as adding a bead for the eye or handstitching around the wing.  An old pair of pants became the belly.


Instructions: Simplicity is good unless it compromises clarity.  There are a few things that are left out, but really should be included for good instructions.  I have only created one project thus far, but there were elements I felt should be included for a solid project.  
Pattern pieces: These are all printed on two pieces of pattern paper and they overlap each other.  I assume this was a design to save paper, but it requires the user to make his or her own pattern by retracing it on more paper.  Hmmm.  Also, the drawstring pajama pants only come in a size small.  If you're not a size small, you must resize them for yourself.  
One cool detail: In the front of the book it says that you can make any of these patterns and sell them.  I think this is fantastic.

I am not stoked about this book.  But it sure does look good.  If you like Joel Dewberry's style, you may really enjoy this book.  I am intrigued to recover a chair now.  If you don't like his fabric, you probably won't like this book.  If you're a more experienced sewer, this book is not for you.  Yet, if you have a really awesome friend who needs a large bird pincushion, you've got yourself a project!


Friday, September 24, 2010

Orange and Grey

Color Inspiration...
Recently I've been very inspired by orange and yellow, when mixed with greys and light blue.

Wes Anderson, forever inspiring with color, here from The Darjeeling Limited.

And from Life Aquatic.

One of my favorite records Blues Roots.  Again, bright orange on a muted palette.  

Shall I begin sewing something orange and grey?  Or painting?  Maybe I'm just ready for Halloween.  We'll see.

Wednesday, September 22, 2010

Flour Jar Glass Etching Tutorial


You know how sometimes you have such great intentions, and then you get thoroughly and completely sidetracked?  That was today.  I had plans to clean out my pantry.  I got to my flour jar and it was nearly empty, with a big bag of unopened flour leaning against it.  I was admiring my flour jar. It is not an antique, but a Target knockoff that looks like the old ones my mom had growing up.  I really wanted to label it, but of course I just couldn't use masking tape or my trusty Sharpie.  So, I got out my old jar of glass etching cream.  What followed was procrastination at its finest.  I highly recommend it.

If you want to etch a design or image on glass, you will need these supplies:
                                   1. Something glass (jar, drinking glass, picture in a frame, jug, etc.)
                                   2. Etching cream (I use Armour Etch)                 
                                   3. An X-acto knife
                                   4. Clear Contact paper
                                   5. A magazine or cardboard upon which to cut
                                   6. A design or word you create or print (pen, paper, computer, printer)
                                   7. A desire to procrastinate, or a desire to create a nice design


First I designed my own font.  It started out pretty messy, as you can see.  Now, if you want to create a glass etching, don't feel that you need to create your own letters.  Simply type out the word you want in a font you like.  Then, print it out.  It's that easy.  Sometimes, for procrastination or aesthetic purposes, I just make things more challenging.  


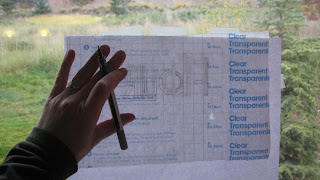
Then, I traced my word onto clear Contact paper.  I taped it up on my sliding glass door so I could see it clearly.  This is a handy technique.  Tips--it helps to use pencil, since with ink, you're at a bad angle for it to run smoothly.  Also, if you're doing this in the evening, you'll need to turn on your inside light and step outside.  Now, it is very important if you are using a word, to make sure you have it the right way!  I copied my word on backwards to the "paper" side of the Contact paper.  Peel a tiny bit away from the corner to see where the sticky side is.  This will help you know where to copy your word or image so it will transfer correctly.


Placing my Contact paper with its "Flour" outline on top of a magazine, I cut each letter out with an x-acto knife.  The way I created my letters, the "R" was the only one with a section that came out.  I kept that inside piece (bottom right of picture), so I could put it on the glass jar latter.  If you have letters like this, cut the inside first (like my "R" section.  Then cut the outer part of the letter.  


I peeled the backing off the Contact paper and stuck it to my jar, lining it up horizontally.  Then I used my fingernails to rub and press the Contact paper down all the way up to the edges, firmly sticking the stencil onto the jar.  I painted the "Armour Etch" on with a paintbrush.  WARNING: this stuff is toxic.  It is seriously intense.  I mean, it etches glass, so what do you expect?  But honestly, they asked for my ID when I bought it.  I know, I know, I look young, but the point is, they don't want any kid near this stuff.  And for good reason.  Use it wisely.  Make sure you keep it far away from your children, your pets, your eyes and anything else you care about.  Follow the instructions on the jar for timing and washing.  For mine, I kept it on for 5 minutes, washed it with tap water and then cleaned it with vinegar (glass cleaner).


Here is my final etching, an art-deco print "flour" on my flour jar.  There were some spots that didn't take the etching very well (especially on the letter "O").  I think this is due to oils or fingerprints on those spaces, although it may be due to my etching cream being old.  I am going to look it up to see if I can find any tips.  I tried to touch those spaces up, and a second coat didn't take either.  Any advice is welcome.    
Ok, I suppose I should really clean out my pantry now.  Wait, I see a plain sugar jar...

Sunday, September 19, 2010

Make Your Own ABC Paintings


I love creating my sons' room and making things to inspire them.  I want to fill their space with handmade love.  I made these ABC paintings for them.  


If you don't think of yourself as artistic, that's okay.  You can create artwork for your child's room easily.  This is a simple way to create a painting.  Basically, you are going to make your own paint-by-number stencil and paint it.  It’s easy.  You can do it!  It's simple and inexpensive.  Here we go...


Supplies:

  • Three canvases.  I used 10 x 10” square canvases.
  • Acrylic paint, colors of your choice.
  • Acrylic latex sealer (Liquitex makes a good one)
  • Paintbrush
  • Computer and printer
  • Paper, preferably heavy stock paper, as you will be making stencils out of your images.

Decide what images you want to represent A, B, and C.

What does your child enjoy?   What kind of images do you want to surround your child?  My 2 ½ year-old son is drawn to things that go.  So, I created Airplane, Bicycle, Car.

Here are some more thoughts and suggestions:

  • Food: A for apple, B for banana, blueberry, C for carrot, coconut?
  • Animals: A for alligator, ape, B for bear, butterfly, C for cat, crow?
  • Flowers: A for apple blossom, B for bluebonnet, C for coneflower?
  • The Four Elements--Plant, human, animal, mineral: A for apple, B for boy, C for cat, D for diamond?
  • Things that Go: A for airplane, B for bicycle or boat, C for car?
  • Music: A for accordion, B for bass, banjo, bongos, bugle, bagpipes, C for cello
  • Insects: A for ant, B for Bee or beetle, C for cricket, or caterpillar

Find your images.

Once you’ve decided on the images you’d like to paint, get on line and do a Google image search (click “image” on the top or left-hand side of the Google search page, then type in your search).  For car, I decided I wanted the iconic Volkswagen Beetle, so I searched "Volkswagen Beetle".  I looked through the images until I found one that I liked.    This is what I found:


Once you’ve saved the image, open it in whichever program you like to resize, such as Paint or Adobe Photoshop. Then print your image.  I found that I needed to print my car and place it on my canvas to make sure it was the size I wanted.  I enlarged it a second time to get it the size I wanted.  (If you have any questions about this step, please place a comment.  I'm happy to explain this in more detail if you'd like.)

Print out your letters.

Open a Word Document.  Write A B C in capital letters.  Highlight the letters and then go to the font bar at the top of the page.   Font options will drop down.  Choose different fonts until you find one that you like.  Fonts like Georgia (ABC), Algerian (ABC), and Cooper (ABC) work well because they have flourishes on the ends, as well as some girth, whereas Arial (ABC) does not.  When you find the font you like, change the font size to a very large one.  I used a 400 pt. font.  The size of font you want to use will be dependent on your font type and size of canvas.  Now print your letters.

Make your stencils.

Cut around your letters and images that you printed, so that you have them as stencils which you can trace.  (My images here are curling on the edges.  Cut yours out of cardstock; they won’t curl and will be easier to trace.)


Paint your canvases.

Buy three identical canvases; I bought 10 x 10” squares because I like the look of those even dimensions.  Paint them each different colors.  Let them dry. (This is actually a good time to make your stencils, as outlined above).


 I highly recommend buying nicer canvases at art stores or stretching your own canvas, so the canvas is stapled on the backside of the canvas rather than on the edges, like they do on cheap canvases.  This allows you to extend your painting onto the edges and not frame your paintings.  (If you would like a tutorial on how to stretch your own canvas, let me know.  I've done it for other paintings, but not these.  I'd be happy to show you.)

However, I will admit to you, I use cheap, acrylic paints, such as these.


Stencil your letters.

Now place your letters on your canvases, measuring one inch down from the top and one inch from the left side of the canvas.  Hold your letter stencil in place and carefully trace around it in pencil.

Stencil your image.

Place your image on your canvas and trace around it.


Now look at your image. You are going to begin cutting each section out and tracing around what you have cut.   

On my car, I see that the next part of the image I want to outline is the wheels.  I cut out the wheels.  Then I trace around the part of the stencil I have left.


Then, I cut out the next section of the stenciled image and I trace around that part.  It is the front windows, the bumper, and behind the back wheel.


Continue cutting each section out and tracing it.  You can see the progression of my drawing in these pictures.


Here I cut out the side sections and then the headlights.  (Sorry for the blur)


Finally, you will get each part of your image drawn in pencil on your canvas.


Paint your image.

Paint one section at a time.  First I paint my letter a single color of green.


Then I use a white to highlight my letter.  I paint the white in a thin line on the top and right sides of my letter ‘C’.  I also paint a few sections of my car in light and medium green.  (I messed up the back right window, painting more than I want.  Later I fix this by painting the background brown over it).


Next, I paint the white/grey sections of my car:  headlights, bumper and the lighter sections of the top.


Then I paint the hood and the black tires.


Next, I paint the fenders and add the license plate.


I paint the inner sections of the tires.


Then I look at the doors of the car.  They are a main part that transitions from light to dark.  So, I go over my first coat of paint and add dark at the top and left side.


Then I add the steering wheel and hubcaps.


Paint a coordinating design around your image.

Whatever your image, choose a coordinating background image to complement it.  For the airplane, I chose clouds, for the bicycle, I chose a gear, for the car, a road.  Give your image a background that makes sense.  Use the same technique we used above for creating a stencil from an online image or your own photograph.


Here I just freehanded the road, but I found an image for the gear for the B painting.


Here you can see how I wrap the road around the sides and bottom of the painting.


I wrap the gears around the sides of this painting also.  Here you can see how poorly it looks to use a cheap canvas where the canvas has been stapled along the sides.  I don’t recommend using this kind.  I wish I had gotten better canvases to begin with. 

Seal image with acrylic sealer.

Acrylic paints, especially cheap ones, are all different luster.  They dry flat.  Use an acrylic sealing varnish to add luster and hold in the brightness.   Use the directions on your acrylic sealer bottle.  I used a ModPodge spray varnish.  I do NOT recommend using it because it was so toxic.  I didn’t want to breathe while using it and I certainly didn’t want to bring it into my sons’ room afterwards.  I let it off-gas in the garage for a couple days.  If you have an art store near you, please go find something better.

Hang and Enjoy.

Hang your homemade artwork in your child’s room.  Enjoy the color, image and care that you created for your child and your home.


Friday, September 10, 2010

Ten on Ten September

Ten on Ten
Take a photo every hour for ten consecutive hours on the tenth of each month. Document a day of your life and find beauty among the ordinary moments.


Thursday, September 9, 2010

Quilted


Streaked by sunlight, the quilted front.
I look forward to putting on the golden binding, which I think will frame the dark grey well.

Pinning the quilt sandwich.

The back. Golden and simple.


Close up detail.


In the sunlight you can really see the crazy texture of the free motion quilting pattern.
Related Posts Plugin for WordPress, Blogger...