


Paint your own modern silhouette.
It's easy!
It's easy!
Supplies:
A picture of you, or your family (see tips at the bottom of this page)
Freezer paper
pencil
X-Acto knife
cutting mat or cardboard
Iron
Thin cardboard box (cereal box)
Silkscreen ink or fabric paint (I like Permaset silkscreen ink, but even the cheap stuff will work for this)
paintbrush
computer and printer
fabric (or a napkin if you're using a small canvas, like me)
stretched canvas (this can be the cheap craft store kind)
Begin:
1. Take a picture of you in action, or you and your sweetie, you and your child, you and your dog. Perhaps you just want a picture of your dog...Why not? Anything works. This is a modern silhouette, not an old stuffy profile.


Here's our photo. Background is horrible, but it doesn't really matter. Wish I hadn't been wearing that sweater. I had to redraw the outline so it looked ok on the silhouette. My husband commented that we all look bulky in our winter wear and thought we should do this project in the summer. The photographer (our sweet neighbor) cut our toes off, so I had to draw them in.
2. Print out your digital picture from the program you use on your computer. If you need to, resize it as large as you like. (If you need more info on this step, please contact me. I'm happy to explain more.)

3. Tape your picture to a window or sliding glass door during the day. Tape a piece of freezer paper on top of it (slick side against the window). Using a pencil, trace the outline of the figures in your picture. (If you're working at night, turn your lights on and go outside. Tape to the outside of your windows. :) ) For pictures of this, go to DIY glass etching in my tutorial section.
4. Place the freezer paper on a cutting mat or cardboard and cut out the figures with an x-acto knife.

5. Place the cereal box on your ironing board, your fabric, right side up, on top of it and your freezer paper on top of your fabric, slick side down. Iron your freezer paper onto your fabric, making sure to push down on all the edges. I have found that ironing with only the pad of the ironing board underneath the fabric doesn't allow for crisp enough edges. (Warning: Make sure you have your cereal box positioned well. There is often a very particular glue on the edges of cardboard boxes that you do not want melting onto your fabric with the iron. Watch out for this! I speak from experience.)
6. Paint with silkscreen ink. Let dry overnight.

7. Peel away your freezer paper. Iron your print by the directions on your ink to heat save your print.

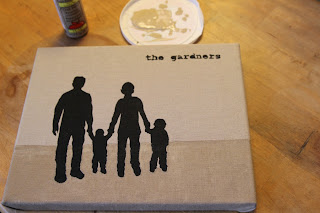
8. Type out your names in Microsoft Word. Play with different fonts and sizes until you get the feel you want. Print out your typed name. Alternatively, use letter stamps and stamp them onto your fabric. For my font, because it was so small and because I like a "messy" feel, I did not include the inner parts of the letters "g", "a", "d", and "e". But if you want something "cleaner" then make sure to cut out those inner parts and save them to iron them on your fabric.

9. Take your canvas out and make sure you get your letters and portrait in the right place before ironing. Trace onto freezer paper and cut out with x-acto knife (steps 3 and 4). Then iron onto your fabric in the place you like (steps 5-7).

10. Ok, now you have your fabric printed. Here I was super excited to have this fabric ready to put on my canvas, and then I lifted the freezer paper off of our name and ...argh!...there was glue from the underneath cereal box melted onto the fabric. Told you I learned by experience. So, I painted a little line to try to cover it up. Didn't look great. I decided to paint in the bottom portion of the fabric, so it looked like we were standing on ground. But, I knew this would be easier after stretching it on the canvas, so I waited.

11. Get out your canvas and line up your lettering and picture just right.

12. Blam! Staple that fabric in the center of the back wooden frame, beginning in the center.

13. Keeping the tension taught but not too stretched, staple with your staple gun along the top edge of your canvas.

14. Pull your fabric across the front of your canvas, holding firmly but not too tightly, making sure the weave of your fabric is even. Then staple the fabric along the back bottom edge of the canvas.

15. Continue stapling along the side edges, pulling the fabric so it is stretched but not too tight all around the frame. Each time, staple the center of the side first, then along the outer edges.

16. Now cut away any extra fabric you have along the back of your canvas so it is easier to work with when folding down each corner.

17. On your first corner, fold down one flap. I decided to make these creases of the fold on the top and bottom of my canvas, rather than the sides. I thought this would be less visible once the canvas hung on the wall.

18. Staple that top flap down.

19. Now fold the side flap over the first staple. Staple the side flap down.

20. Do this on all four corners. They should look like the photo above. If you would like the back of your canvas to look better, you can now cut all the fabric straighter. If you feel like it doesn't matter, because it will be hugging your wall, then you're done!

21. The front of your canvas will have nicely tucked corners. Oooh. Nice.

22. Now I added the "mistake element"--the ground--that frankly, I love! Thank the Universe for mistakes. It can bring the most creative moments to my work. However, if you happen to really like this look, I highly recommend you do this first. Paint it on using a ruler before you put your portrait stencil on the fabric. It will be easier. But you can do it at the beginning or at the end. At the end, you just have to carefully paint around your portrait stencil. I also used my paint on the bottom of the canvas and the "ground" portion of the sides. By the way, here I did not use my favorite silkscreen ink. I used $.99 acrylic Wal-Mart paint.

23. Hang your beautifully hand-created family portrait silhouette on your wall.
Tips for taking a good silhouette photo(Please read):
- Make sure you get your picture either straight-on or as a profile. 3/4 turns look odd in silhouette.
- Make sure legs are at least slightly apart. If they are together, the silhouette looks more like a puppet on a stick.
- Make sure arms are also slightly away from the body.
- If there are two or more people in the photo, make sure your bodies are not overlapping too much. You'll see how this can turn out oddly in a silhouette. Think two-headed monster.
- Use a digital camera and take many photos. Sometimes the ones you don't expect to be your favorites are the best ones.
- Make sure the lighting is such that there will not be heavy shadows on your figures. This will make finding the outline of people more difficult.
- It doesn't matter if your eyes are closed or if you're making a funny face (awesome, eh?).
- It will be easier to cut out your silhouette if you are against a fairly blank background, such as a plain wall or a fence.
- Make sure your whole body is in the picture. Cutting a figure off at the ankles will not work for these modern silhouettes.
Here is another example of modern silhouettes I made of my niece for my mother. I turned it into a pillow for her for Mother's Day two years ago.

Anna Scout dancing at 2 years old. I love that she is barefoot!
Awesome. I love this.
ReplyDeleteI've put together a round up of great wall art ieas on Craft Gossip today and included your post. :) You can see it here
ReplyDeletehttp://homeandgarden.craftgossip.com/25-awesome-wall-art-ideas/
If you would like a Craft Gossip badge showing you've been featured, you can grab one here :)
http://homeandgarden.craftgossip.com/grab-a-craft-gossip-button/